 |

ay 6 – Unknown Traverse to Bear Pass and the Southern Half of the Bailey Range
Our trip, which combined two separate cross-country traverses done by my parents, would
require finding the best route between Mount Olympus and the Bailey Range. Initially,
Douglas and I planned to follow my parents’ tracks from Mount Olympus into the Queets
Basin and then ascend to the southern end of the Bailey Range at Bear Pass. Upon closer
inspection of the map, we wondered if a high traverse on the ridge line between Mount
Olympus and Bear Pass would be possible, even though this route was not mentioned in the
guidebook. Now, influenced by our success on the Hubert Glacier, we were willing
to take that gamble. Again, we embraced the unknown, wondering if the true crux of our trip
still lay ahead.
The early-summer snow cover and cloudless weather made the going fairly easy; or perhaps
too easy? Our fears were confirmed by the sometimes tricky route-finding. Our decisions
were often complicated by the fact that our topo map had not been updated to reflect
glacial recession. Where the map showed snow, we would often find rock; while areas depicted
as rock would be covered by early season snow. The first key to this traverse was negotiating
a steep and loose rock shelf overlooking the Humes Glacier far below. The second was a lucky
guess as to which notch in the ridge line to aim for. At each bend in the ridge, we expected
our route-finding fears to be confirmed. But again, we were pleasantly surprised at our success
at navigating an undocumented route. I realized that the rolling Olympic terrain is much more
forgiving than the rugged North Cascades I had become used to. Only a few hours after we left
Camp Pan, we were enjoying an early lunch at Bear Pass. The high ridge route had proved
enjoyable and much quicker than dropping into the Queets Basin and climbing back up. The
melt-water ponds in the snow below us formed a smiley face that symbolized our whole day,
and our whole trip for that matter.
 |
 |
|
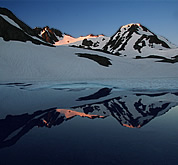
Lake reflection, Bailey Range. © Steph Abegg. Enlarge |
|
 |
We had given ourselves a full day to get to Bear Pass, so were well ahead of schedule. The
Bailey Range – a twelve mile curving chain of peaks paralleling the upper Hoh River – stretched
out in front of us, compelling us onwards. The ridge was covered with snow, making for
effortless travel and straightforward route-finding and so by late afternoon we were halfway
through the Bailey Range. Our lighter packs and stronger bodies made up for my need to pull
out my camera every five minutes.
Shortly before the lake west of Mount Ferry where we set up camp, we passed through an area that
looked very familiar to me. Then I recognized ‘The Tree.’ This gnarled old tree is the subject
of a photo in my parents’ bedroom, taken during a traverse of the Bailey Range shortly after
their marriage in 1975. ‘The Tree’ has come to represent the glory days, captured only in distant
memories and fading photographs but now being revived through my experiences. Interestingly,
this tree is also shown in the guidebook, which calls this saddle “Lone Tree Pass.” As though
aware of its landmark status, ‘The Tree’ looks much the same as it did over thirty years ago.
Day 7 – Side-Hilling on the Northern Half of the Bailey Range
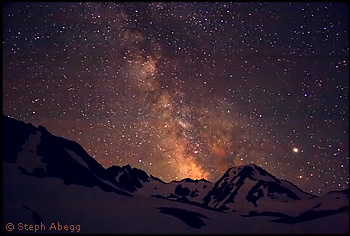
I had spent much of the night expending my stash of camera batteries on the bright swath of the
Milky Way that graced the inky sky. So I was awake to enjoy the pink colors of sunrise on a
snowcapped Mount Olympus across the valley, a beautiful beginning to the seventh day of our journey.
As usual, we had used the tent as a pillow and slept under a blanket of stars, so packing up camp was quick.
 |
 |
|
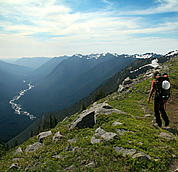
Hiking out on the High Divide. Enlarge © Steph Abegg |
|
 |
Mount Olympus seemed so far away we were staggered that we had been there just the previous
morning. After the brush of our first two days, the sweeping alpine terrain seemed to fly by.
We could see the entire ridge line we had traversed – from the Valhallas over Mount Olympus to
Bear Pass and along the Bailey Range. By the end of our trip we would have seen Olympus from
almost every side, both up-close and from a distance.
While the southern half of the Bailey Range is generally a flat ridge, the topography of the northern half changes to steep south-facing
slopes. Most of the snow had just melted, so the slopes were often quite slippery. Douglas
performed the only self-arrest of the trip in a patch of wet, muddy heather. We followed heather terraces and animal tracks as much as we could, staying between 5,000 and
5,500 feet. Every so often, a grassy shelf carpeted with white avalanche lilies would offer a
brief respite from the steep side-hilling. We would stop and marvel at the rugged white-capped
mountains across the deep valley where the Hoh River coursed 4,000 feet below.
After about six miles of side-hilling, a thin climbers trail appeared. Having
a defined path felt strange. The miles began to go by quickly, and by late afternoon we reached the “catwalk,”
an exposed section of trail at the east end of the High Divide. I narrowly escaped being pitched
off the edge when a rather sizable chunk of rock from the ancient sea floor broke loose in my grip.
Too soon, I had become complacent to the false security of a trail.
We hiked on for a few more miles and in the fading light we were forced to set up camp in a bed
of glacier lilies bordering the trail. After capping the day by breaking two standing backcountry
rules - camping on the trail and trampling flowers – we lightened the mood by jokingly discussing
capturing a grouse and cooking it over a campfire fueled by our permit. But instead, we spent our
energies attempting to eat up our extra food. I made some peanut butter cranberry mashed potato
tuna tortilla wraps. Yum!
Day 8 – High Divide and the Long Trail Slog Along the North Fork of the Hoh
We couldn’t believe that it was already the last day of our trip. We had planned on ten days,
but due to stellar weather, good route-finding, long and tiring days at a great pace, the 58-mile
off-trail part of the traverse had only taken us seven days. We considered taking a rest day on the
High Divide but high clouds suggested a return of ‘normal’ Olympic Mountain weather. Plus at this
point, fresh food and showers were sounding pretty good. So, we began the grueling 19-mile hike out.
At least it was all on trail.
However, the next section was not as easy as we had anticipated. Much of the High Divide was covered in snow, and
the trail down to the Glacier Meadows Ranger Station had not yet been cleared of the winter blow-downs.
At one point, we didn’t touch the ground for almost four switchbacks as we hauled ourselves from one
fallen tree trunk to the next.
Finally, we arrived at the Glacier Meadow Ranger Station nine miles upstream from the Hoh River
trailhead. We saw the first people we had seen in over a week. For the first time of the trip, I
began to notice the fairly thick layer of dirt caked onto my skin and the rather pungent smell
emanating from my sweaty clothes.
 |
 |
|
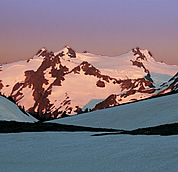
Olympus from the Bailey Range. Enlarge © Steph Abegg |
|
 |
As we hiked along, people would ask us “Did you summit?” At first we were confused, but then it
dawned on us that this trail was the standard approach route to Mount Olympus and most folks with
ice axes and crampons on their packs would have come from there. But to us, Mount Olympus seemed
the distant past, just another stepping stone on a greater journey. We would have liked much more
time to tell our story, but alas we needed to hurry to find a ride to our car parked at the South
Fork of the Hoh.
Despite trail-tired legs, we quickly hiked the final few hours to the Hoh River trailhead. Although
the trailheads for the Hoh and South Fork are only about six miles apart, the shortest drive takes
you on a 50-mile route to Highway 101 and back. Fortunately, we didn’t have to wait long before we met
a friendly artist from San Francisco and his elderly dad who were willing to load two smelly backpackers
into their station wagon and drive us up the South Fork to our car. We entertained them with stories from
our trip of a lifetime.
Life After the Olympic Traverse
I now realize why my dad never returned to his job in the Midwest after meeting my mom in the Olympic
Mountains. The Olympics are a special place – for their unique location rising out of the Pacific Ocean,
their heavy glaciation, their wild beauty, and their friendliness towards those who, like Douglas and I,
deviate from the beaten path.
Three days after Douglas and I completed our grand 77-mile high ridge line tour around Mount Olympus, I
found myself in my parents’ living room, showing them photos from the trip. I finally saw our trip in its
entirety, instead of from a day-to–day and obstacle-to-obstacle perspective. I was amazed at the breadth
of territory we had covered, our luck with cloudless blue skies, and our fortunate series of route-finding
decisions. Like my parents’ mountain excursions 30 years previous, our grand traverse was now preserved in
memories and photographs and would serve to fuel many future adventures. |

|
| Tips on Night photography |
If you find Steph’s night photography as stunning as the editorial team here at NWMJ, you might be interested in her tips on how she does it. |
 |
| Patience |
 |
Night photography takes patience, practice, and a tolerance for staying up late in the cold. But the resulting photos are always worth the effort! Long exposures often bring out colors and soft light that is difficult to see with the naked eye. (And sipping hot tea out of a Nalgene bottle, bundled up in a sleeping bag under a blanket of stars can actually be quite enjoyable.) |
 |
Technical |
 |
I use a tripod (or rock) and remote shutter control for night photography,
since shutter speeds vary from 20 seconds to a couple of hours. Typically an exposure of 30 seconds or less will give still star
shots, while longer exposures will reveal star streaks caused by the rotation of the earth.
Typical camera settings for night photography depend on what kind of object you are photographing (the moon, stars, a lit object
like a tent), whether or not the moon is in the sky, and what kind of star effect you want (streaks or pinpoints). Finding the right
settings can be a trial and error process, but after a while, you learn what settings will achieve a particular photographic goal.
Sometimes an unusual combination of settings can lead to the most interesting effects, so don’t be shy to experiment a bit!
For most night photos, a low ISO speed is desirable to reduce camera noise and a small aperture (higher f-stop number) to give a
larger depth of field. However, lower ISO speed and smaller aperture also reduce the amount of light the camera captures, so this means
long exposure times (i.e. slower shutter speeds). The ability to immediately view an image on a digital camera comes in handy!
(Not to mention the ability to adjust the ISO exposure by exposure).
Hint: If you are not sure what exposure settings to use, you might want to take a few trial photos with high ISO and relatively fast shutter speeds. When you find the combination that produces the desired lighting, you can "stop down" the ISO (a lower ISO is desirable as it results in less noise in the image) and "stop up" the shutter speed or aperture by an equal number of stops.
The photo at the top of this page was photographed at 30 second exposure, f4.0, ISO 1000. |
| |
| |
|
 |


